Animations in React Native
Agenda
- What is animation?
- How animation can be done in React Native. A brief overview.
- Animated API
- LayoutAnimation API
- Reanimated
- Third-party solutions for animations
- Conclusion and QA session
What is animation?
Animations in mobile applications
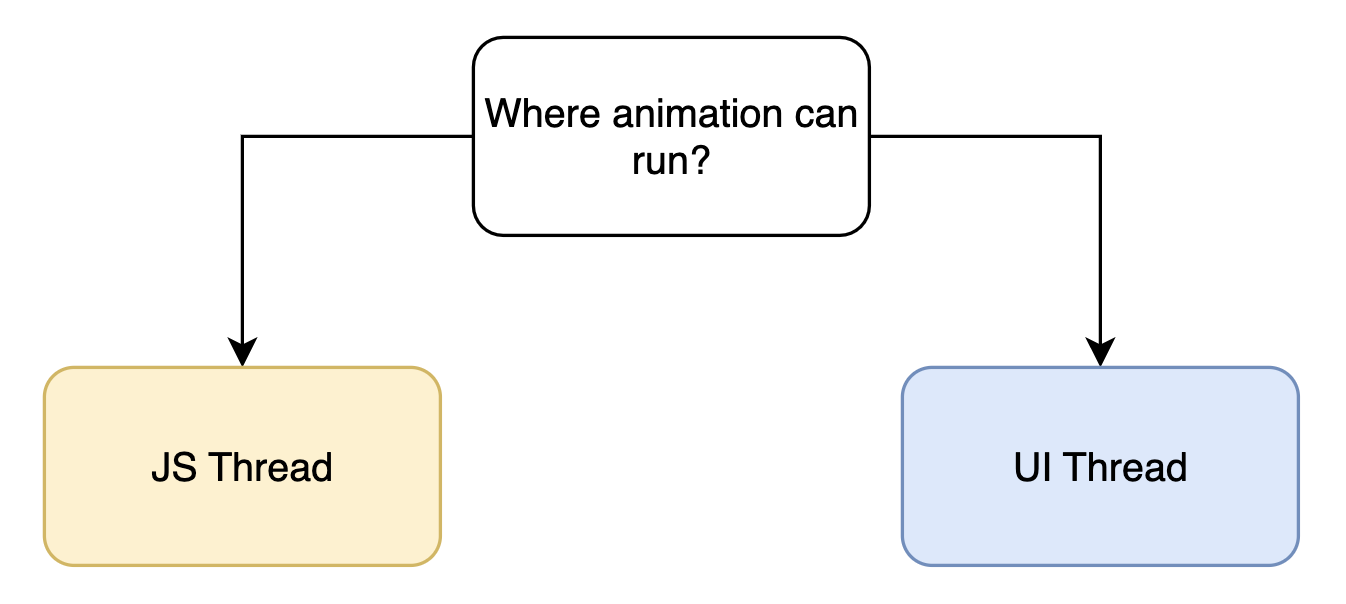
How animation can be done in React Native
- JavaScript
-
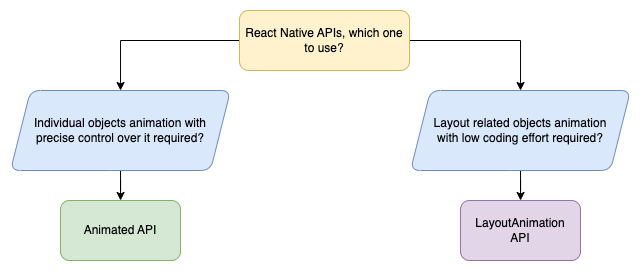
React Native APIs:
- Animated API
- LayoutAnimation API
-
Third-party solutions:
- Reanimated
- Lottie
- Rive and others
Animation with plain JavaScript
Animation with plain JavaScript
                import React, { useState } from 'react';
                import { Button, SafeAreaView, View } from 'react-native';
                import { styles } from './screens.styles';

                export const PlainJsScreen: React.FC = () => {
                  return (
                    <SafeAreaView style={styles.wrapper}>
                      <View style={styles.screenContainer}>
                        <View style={styles.ball} />
                        <View style={styles.button}>
                          <Button title="Animate!" />
                        </View>
                        <View style={styles.button}>
                          <Button title="Reset" />
                        </View>
                      </View>
                    </SafeAreaView>
                  );
                };
Animation with plain JavaScript
                import React, { useState } from 'react';
                import { Button, SafeAreaView, View } from 'react-native';
                import { styles } from './screens.styles';

                export const PlainJsScreen: React.FC = () => {
                  const [translation, setTranslation] = useState(0);

                  const onAnimatePress = () => {
                    for (let i = -100; i < 0; i++) {
                      setTimeout(() => setTranslation(i), 10 * -i);
                    }
                  };

                  return (
                    <SafeAreaView style={styles.wrapper}>
                      <View style={styles.screenContainer}>
                        <View
                          style={[
                            styles.ball,
                            {
                              transform: [{ translateY: translation }],
                            },
                          ]}
                        />
                        <View style={styles.button}>
                          <Button title="Animate!" onPress={onAnimatePress} />
                        </View>
                        <View style={styles.button}>
                          <Button title="Reset" onPress={() => setTranslation(0)} />
                        </View>
                      </View>
                    </SafeAreaView>
                  );
                };
Animation with plain JavaScript
Animation with plain JavaScript
Animation with plain JavaScript
- Unnecessary code complexity
- Low performance and animation interruptions
- setState being used. Link to docs
React Native APIs
- Animated API Documentation
- LayoutAnimation API Documentation
Animation with Animated API
Animated API. Let's start
What:
Animate our component's positionHow:
Using 'transform' property animationWhat we need:
- A value
- A function that changes our value
- A way to link our component style to the changing value
Animated API. Value and animation methods

import { Animated } from 'react-native';
const translation = useRef(new Animated.Value(0)).current;
                Animated.timing(translation, {
                  toValue: -100,
                  duration: 1000,
                }).start();
Animated API. Animated components
                  <Animated.View
                    style={[
                      styles.ball,
                      {
                        transform: [{ translateY: translation }],
                      },
                    ]}
                    />
                  </Animated.View>
Animated components:
- View
- Text
- ScrollView
- FlatList
- SectionList
- Image
Animated API. timing method
timing() method options:
- duration
- easing
- delay
- isInteraction
- useNativeDriver
Animated API. Easing
Easing allows you to specify the function that defines how animated parameter will change over time.
import { Animated, Easing } from 'react-native';
                Animated.timing(translation, {
                  toValue: -100,
                  duration: 1000,
                  easing: Easing.bounce,
                }).start();
                Animated.timing(translation, {
                  toValue: -100,
                  duration: 1000,
                  easing: Easing.out(Easing.bounce),
                }).start();
Animated API. useNativeDriver
useNativeDriver when set to 'true' sends all the animation data processing to the UI thread (native side).
                Animated.timing(translation, {
                  toValue: -200,
                  duration: 1500,
                  useNativeDriver: true,
                }).start();
useNativeDriver features to be aware of:
- Animated values are only compatible with one driver.
- Not all Animated features are supported with native driver.
If you use native driver while animating the value, every animation on this value further should use the native driver too.
You can only animate non-layout properties (transform, opacity) - position and flexbox properties won’t work.
Animated API. Composition
Composition functions:
- Animated.delay(). Starts an animation after a given delay.
- Animated.parallel(). Starts a number of animations at the same time.
- Animated.sequence(). Starts the animations in order, waiting for each to complete before starting the next.
- Animated.stagger(). Starts animations in order and in parallel, but with successive delays.
Animated API. Composition. Parallel
To launch animations in parallel we simply need to wrap them with Animated.parallel([]).
                Animated.parallel([
                  Animated.timing(nativeTranslation, {
                    toValue: -200,
                    duration: 1500,
                    useNativeDriver: true,
                  }),
                  Animated.timing(translation, {
                    toValue: -200,
                    duration: 1500,
                    useNativeDriver: false,
                  }),
                  Animated.timing(size, {
                    toValue: 50,
                    duration: 1500,
                    useNativeDriver: false,
                  }),
                ]).start();
If one animation is stopped or interrupted, all other animations in parallel are also stopped:
                const onStopPress = () => {
                  Animated.timing(translation, {
                    toValue: -100,
                    useNativeDriver: false,
                  }).stop();
                };
Animated API. Composition. Sequence
Sequence launches the provided animations one after another:
                Animated.sequence([
                  Animated.timing(nativeTranslation, {
                    toValue: -200,
                    duration: 1500,
                    useNativeDriver: true,
                  }),
                  Animated.timing(translation, {
                    toValue: -200,
                    duration: 1500,
                    useNativeDriver: false,
                  }),
                  Animated.timing(size, {
                    toValue: 50,
                    duration: 1500,
                    useNativeDriver: false,
                  }),
                ]).start();
If the current running animation is stopped, no following animations will be started.
Animated API. Composition. Stagger
Stagger is very similar, but it allows you to additionally specify the delay between animations:
                Animated.stagger(2000, [
                  Animated.timing(nativeTranslation, {
                    toValue: -200,
                    duration: 1500,
                    useNativeDriver: true,
                  }),
                  Animated.timing(translation, {
                    toValue: -200,
                    duration: 1500,
                    useNativeDriver: false,
                  }),
                  Animated.timing(size, {
                    toValue: 50,
                    duration: 1500,
                    useNativeDriver: false,
                  }),
                ]).start();
Array of animations may run in parallel (overlap) if you specify duration values that are longer than delay between animations.
Animated API. Composition. Delay
Animated.delay() is meant to be used in Stagger or Sequence to put delays between animations:
                Animated.sequence([
                  Animated.timing(nativeTranslation, {
                    toValue: -200,
                    duration: 1500,
                    useNativeDriver: true,
                  }),
                  Animated.delay(2000),
                  Animated.timing(translation, {
                    toValue: -200,
                    duration: 1500,
                    useNativeDriver: false,
                  }),
                ]).start();
You can pass delay to animation config as an option with the same result:
                Animated.sequence([
                  Animated.timing(nativeTranslation, {
                    toValue: -200,
                    duration: 1500,
                    useNativeDriver: true,
                  }),
                  Animated.timing(translation, {
                    toValue: -200,
                    delay: 2000,
                    duration: 1500,
                    useNativeDriver: false,
                  }),
                ]).start();
Animated API. Composition. Combination
Not only Animated.delay() can be used in combination with other methods:
                Animated.sequence([
                  Animated.timing(nativeTranslation, {
                    toValue: -200,
                    duration: 1500,
                    useNativeDriver: true,
                  }),
                  Animated.parallel([
                    Animated.timing(translation, {
                      toValue: -200,
                      duration: 1500,
                      useNativeDriver: false,
                    }),
                    Animated.timing(size, {
                      toValue: 50,
                      duration: 1500,
                      useNativeDriver: false,
                    }),
                  ]),
                ]).start();
Animated API. Spring
Spring() is a method that animates a value according to a spring based model.
Animated API. Spring
In case of spring we don’t specify the animation duration directly. Instead we have a config object where we can set speed:
                    Animated.spring(nativeTranslation, {
                      toValue: -100,
                      useNativeDriver: true,
                      speed: 12,
                      bounciness: 30,
                    }).start();
With spring() use either speed/bounciness or friction/tension pair of settings to control your animation.
Animated API. Interpolation
"Interpolation - a type of estimation, a method of constructing (finding) new data points based on the range of a discrete set of known data points".
| 0 | 0.3 | 0.5 | 1 |
| 0 | 30 | 50 | 100 |
| 0 | -60 | -100 | -200 |
                    const animatedValue = useRef(new Animated.Value(0)).current;

                    Animated.timing(animatedValue, {
                      toValue: 1,
                      duration: 1500,
                      useNativeDriver: false,
                    }).start();
                    const translate = animatedValue.interpolate({
                        inputRange: [0, 1],
                        outputRange: [0, -200],
                    });
                    const size = animatedValue.interpolate({
                        inputRange: [0, 1],
                        outputRange: [100, 50],
                    });
                    <Animated.View
                      style={[
                        {
                          transform: [{ translateY: translate }],
                        },
                        {
                          width: size,
                          height: size,
                        },
                      ]} />
Animated API. Interpolation
Animating the color with interpolation:
                <Animated.View
                  style={[
                    {
                      backgroundColor: animatedValue.interpolate({
                      inputRange: [0, 1],
                      outputRange: [‘red’, ‘blue’],
                      }),
                    }
                ]} />
Using multiple range segments in interpolation:
                value.interpolate({
                  inputRange: [-300, -100, 0, 100, 101],
                  outputRange: [300, 0, 1, 0, 0]
                });
| Input | Output |
|---|---|
| -300 | 300 |
| -200 | 150 |
| -100 | 0 |
| -50 | 0.5 |
| 0 | 1 |
| 50 | 0.5 |
| 100 | 0 |
| 101 | 0 |
Animated API. Interpolation. Easing
You can specify easing function for interpolation:
                <Animated.View
                  style={[
                    {
                      backgroundColor: animatedValue.interpolate({
                      inputRange: [0, 1],
                      outputRange: [‘red’, ‘blue’],
                      easing: Easing.cubic,
                      }),
                    }
                ]} />
Animated API. Interpolation. Extrapolation
In mathematics, extrapolation is a type of estimation, beyond the original observation range. Let’s say we want to start changing size only when my animated value reaches 0.5.
                <Animated.View
                  style={[
                    {
                      backgroundColor: animatedValue.interpolate({
                      inputRange: [0.5, 1],
                      outputRange: [100, 50],
                      }),
                    }
                ]} />
React Native will try to extrapolate and guess what output value should be when the input is 0. In the example above it will be 150. But that’s not what we want:
                <Animated.View
                  style={[
                    {
                      backgroundColor: animatedValue.interpolate({
                        inputRange: [0.5, 1],
                        outputRange: [100, 50],
                        extrapolateLeft: 'clamp',
                      }),
                    }
                ]} />
Apart 'extrapolateLeft' we can use 'extrapolateRight' or 'extrapolate' to set both.
Animation with LayoutAnimation API
LayoutAnimation API
LayoutAnimation Documentation
Pros:
- Simplicity
- Performance
Cons:
- Limited control over animation properties
LayoutAnimation API
Task:
Animate a login screen that can show different inputs depending if you log in or register for the first time
To make things work on Android the following code is required:
                      if (Platform.OS === 'android') {
                        if (UIManager.setLayoutAnimationEnabledExperimental) {
                          UIManager.setLayoutAnimationEnabledExperimental(true);
                        }
                      }
LayoutAnimation API
As stated in RN documentation, “A common way to use this API is to call it before updating the state”. So let’s do it:
                    const onStateSwitch = (newState: AUTH_SCREEN_STATE) => {
                      LayoutAnimation.configureNext(LayoutAnimation.Presets.linear);
                      setScreenState(newState);
                    };
Don't forget to import the LayoutAnimation module from react native. After that just configure next layout animation using the provided presets.
Apart from linear preset other available options are “easeInEaseOut” and “spring”. If you need more control, custom config is the way to go.
LayoutAnimation API. Custom config
LayoutAnimation.configureNext accepts the config object as its first parameter with the following
fields:
• duration in milliseconds
• create, optional config for animating in new views
• update, optional config for animating views that have been updated
• delete, optional config for animating views as they are removed
And every optional config supports:
• type, the
animation type to use
• property, the layout property to animate
(optional, but recommended for
create and delete)
- supported props are opacity, scaleX, scaleY and scaleXY.
• springDamping, optional config for animating views that have been updated
• initialVelocity, optional config for animating views as they are removed
• delay, optional config for animating views as they are removed
• duration, optional config for animating views as they are removed
                    const customLayoutAnimation = {
                      duration: 400,
                      update: {
                        type: LayoutAnimation.Types.linear,
                        property: LayoutAnimation.Properties.opacity,
                      },
                    };
                      const onStateSwitch = (newState: AUTH_SCREEN_STATE) => {
                        LayoutAnimation.configureNext(customLayoutAnimation);
                        setScreenState(newState);
                      };
LayoutAnimation API. Custom config
                    const customLayoutAnimation = {
                      duration: 400,
                      create: {
                        duration: 700,
                        type: LayoutAnimation.Types.linear,
                        property: LayoutAnimation.Properties.opacity,
                      },
                      update: {
                        type: LayoutAnimation.Types.linear,
                        property: LayoutAnimation.Properties.opacity,
                      },
                      delete: {
                        duration: 100,
                        type: LayoutAnimation.Types.linear,
                        property: LayoutAnimation.Properties.opacity,
                      },
                    };